Workflow in Platform: A full guide
Please note that the facilities must already be set up in the system, the digital twin configured and the alerts prepared. If you have booked a migration service, we will take care of this for you.
1. Alert-system: detection and analysis of errors
The Platform continuously monitors your facilities and automatically detects typical error scenarios, such as deviations or failures in facility components, e.g. inverters.
1.1 Receiving and assigning alerts
As soon as the integrated alert system detects an error, this is displayed in the platform's alert panel.
In the “ Alerts” tab, the number of current alerts is displayed in a red circle icon () next to the “Alerts” menu item.
Preparation: Before you receive alerts, make sure that notifications are activated and alerts are assigned to you:
1. Go to the company admin by clicking on your company name in the top right corner.![]()
2. Navigate to the “Alarm Assignees” tab.
3. Add new rules using the “+ New assignment rule” button. Define:
- Severity of the alerts
- The affected facilities
- The assigned users

To ensure that the notifications arrive, open your profile (top right, initials).

In the profile area, scroll down to the “Notifications” section. Activate Notifications and select the desired language.

Then scroll down to “ Alerts” and activate the desired notifications for the alert severity levels that you would like to be informed about. Then click on “Save”.

1.2 Alert analysis
Once a problem has been detected (e.g. “Inverter power deviation”), you can take direct action in the alarm area:
1. Open the “Alerts” tab to see an overview of all active alerts.
2. Click on “Show in monitoring” for the relevant alert. Here you will see a detailed display of the deviations, e.g. inverter power.
3. Analyze the alert. If the deviation indicates an actual fault (e.g. significant power deviations in an inverter), further steps must be initiated.
However, if the alert is not classified as relevant, you can mark it as completed under “Actions” using the “Confirm” button.
2. Create ticket: Management of tasks
A ticket is the central component for managing the processing of a technical problem. It enables structured documentation and tracking of all measures required to resolve the problem.
2.1 Ticket system
- Under “Actions” of the alert, click on “Create ticket”
to generate a ticket.
- Name the ticket accordingly, e.g. “Inverter power deviation”. You can also add labels to better categorize the ticket.
- Assign the ticket to one or more responsible persons.

A ticket can use predefined templates that contain specific instructions, such as
- Remote inspection of the inverter
- Photo documentation for on-site visits
- Travel times and distances for the technician
These templates help to efficiently design and repeat standard processes, which speeds up processing and provides clear instructions.
2.2 Problem tracking
Once the ticket has been created, you will see a history of all associated steps, comments and tasks. You can add images, files and additional notes to document the progress of the processing.

3. Services: Planning and execution of measures
If you determine that the problem needs to be solved as part of a service, you can create an service. A service is a specific task that is carried out as part of a ticket. A ticket can run through several services, e.g. an initial analysis and later the replacement of a defective inverter. This flexibility enables detailed and clear management of the repair and maintenance process.
3.1 Service planning
To plan an service:
1. open the “Tickets” tab to see an overview of all tickets.
2. Open the ticket and click on “Add to maintenance”.

3. You can either add an service to an existing ticket or create a new service.

4. Give the service a name, e.g. “Inverter investigation”.
5. Select a suitable template and assign the service to a technician.
6. Specify whether the service should be carried out immediately or on a specific date.

Services can be carried out both online and offline. Technicians on site have the option of using tablets to work through the service step by step.
3.2 Calendar: service planning and capacity overview
The Platform's integrated calendar provides a comprehensive overview of all planned services and tasks:
1. Open the “Services” tab to see an overview of all active services.
2. in the list view or calendar view, you can view all services.
![]()
3. the calendar shows free capacities in order to plan resources optimally and avoid bottlenecks.
3.3. Service monitoring and completion
During the service, the technicians document their progress in the platform. You can:
- Add comments
- Attach images and files
- complete tasks
As soon as all tasks have been completed, click on “finish service”.

If the service is not successful (e.g. if the inverter cannot be repaired on site), the ticket is returned for further processing. In this case, additional measures can be planned, such as the replacement of a defective device.
4. Replace the inverter: Device management
If the inverter is defective and cannot be repaired, the platform makes it easy to replace the device without losing important historical data.
4.1. Replacing the inverter
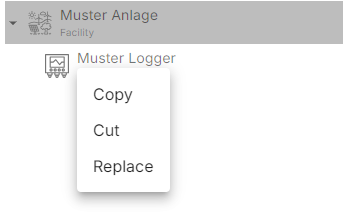
1. Go to the digital twin of your facility and right-click on the affected device.

2. Select the “Replace” option.
3. The next window shows the effects of the replacement:
-
- The device is marked as replaced and moved to a separate area.
- The associated calculations, formulas and assignments are retained.
- The replaced device contains the addition “Replaced on [date]” and remains available in the history.
4. Select an exchange date and confirm the exchange.

Please note: There is no undo option for replacing a device. Therefore, make sure that you want to carry out this action safely.
5. Reports and yield loss calculation
5.1 Maintenance and service reports
After completing a service, you can create reports directly via the platform:
1. Select a suitable template in the “Reports” tab. (e.g. “Maintenance and service report” in the case of “Inverter performance deviation”)


2. select the desired service.
3. Add the recipient and the language.
4. Optional: Reports can also be sent as a PDF by clicking on the “Send as PDF” field.

These reports serve as official documentation of the completed mission.
5.2 Yield loss calculation
Yield losses caused by the failure of components such as inverters can be calculated within the platform:
- Peak billing: For losses caused by grid operators or direct marketers.
- Flat-rate billing: For flat-rate billing for regulations.
- Device comparison: Compares defective devices with functioning devices from the same portfolio.
The calculated losses can be shown directly in the reports.
6. Logbook: Comprehensive documentation of all processes
The logbook of Platform documents all activities that take place during the operation of your facility, including:
- Operations carried out for maintenance or servicing
- Created and processed tickets that map problems, tasks or incidents
- Inverter replacements and other replacements of key components
- On-site visits, such as inspections or maintenance operations
- Shutdowns ordered by grid operators or other regulatory bodies
For further information and detailed instructions on the individual topics, additional articles are available in our Knowledge Base.
Need More Help?
If you encountered any difficulties or need further assistance, here are some steps you can take:
Contact Support:
- Email: Reach out to our support team by emailing us at support@amperecloud.com. Provide as much detail as possible about the issue you're facing.
- Fill out a form: Complete our online support form. Please include all relevant information about your request, and our team will get back to you as soon as possible.
Share Your Feedback
If this article didn’t meet your needs or if you have suggestions on how we can improve, please let us know by submitting feedback. Your input helps us enhance our resources and support.